A separate EmbroideryConnect device is needed for each embroidery machine on the network. Designs can be ‘pushed’ to a named device or ‘pulled’ via barcode reader at each machine.
Device features are summarized below:
|
Item |
Description |
|
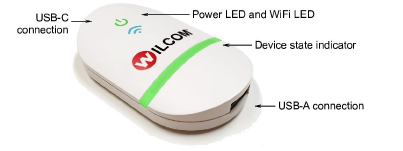
EmbroideryConnect device |
The device itself is small and compact. It can plug directly into an embroidery machine USB port or via USB extender cable. |
|
USB-C connection |
USB-C connection at top to connect device to PC or embroidery machine. |
|
USB-A connection |
Separate USB-A input port for USB barcode reader. |
|
Device state indicator |
The device displays basic status information. See below for details. |
|
Power from USB |
No separate power supply needed – power is drawn from USB port. |
Tip: The EC device comes with 3M mounting strips to attach it to the target machine.
The EC device indicates various devices states. The following table explains the color coding…
|
When… |
Status light |
Status |
|
Attaching device to machine |
Solid green |
Device is running smoothly so machines can access designs. |
|
Scanning barcode |
Flashing orange |
Barcode scan failed. Scanned file not found in design queue. |
|
|
Flashing purple |
Device cannot connect to EmbroideryHub for design request. |
|
Sending design to device |
Flashing yellow |
Device is unmounted. |
|
|
Flashing orange |
Sent file already exists on device. |
|
|
Flashing red |
Error occurred. |
|
Copyright ©2024 Wilcom Pty Ltd | Terms of Use | Privacy Policy |